Rogue Router: Captive Portal
What does it take to open the «smallest network» in the world? The goal of this experiment is to create an awareness of how a server works and to learn practically how you can provide a simple website in a specially created WIFI! That means this server is not connected to the Internet – it and your receiving device form the network…
Tech Prologue
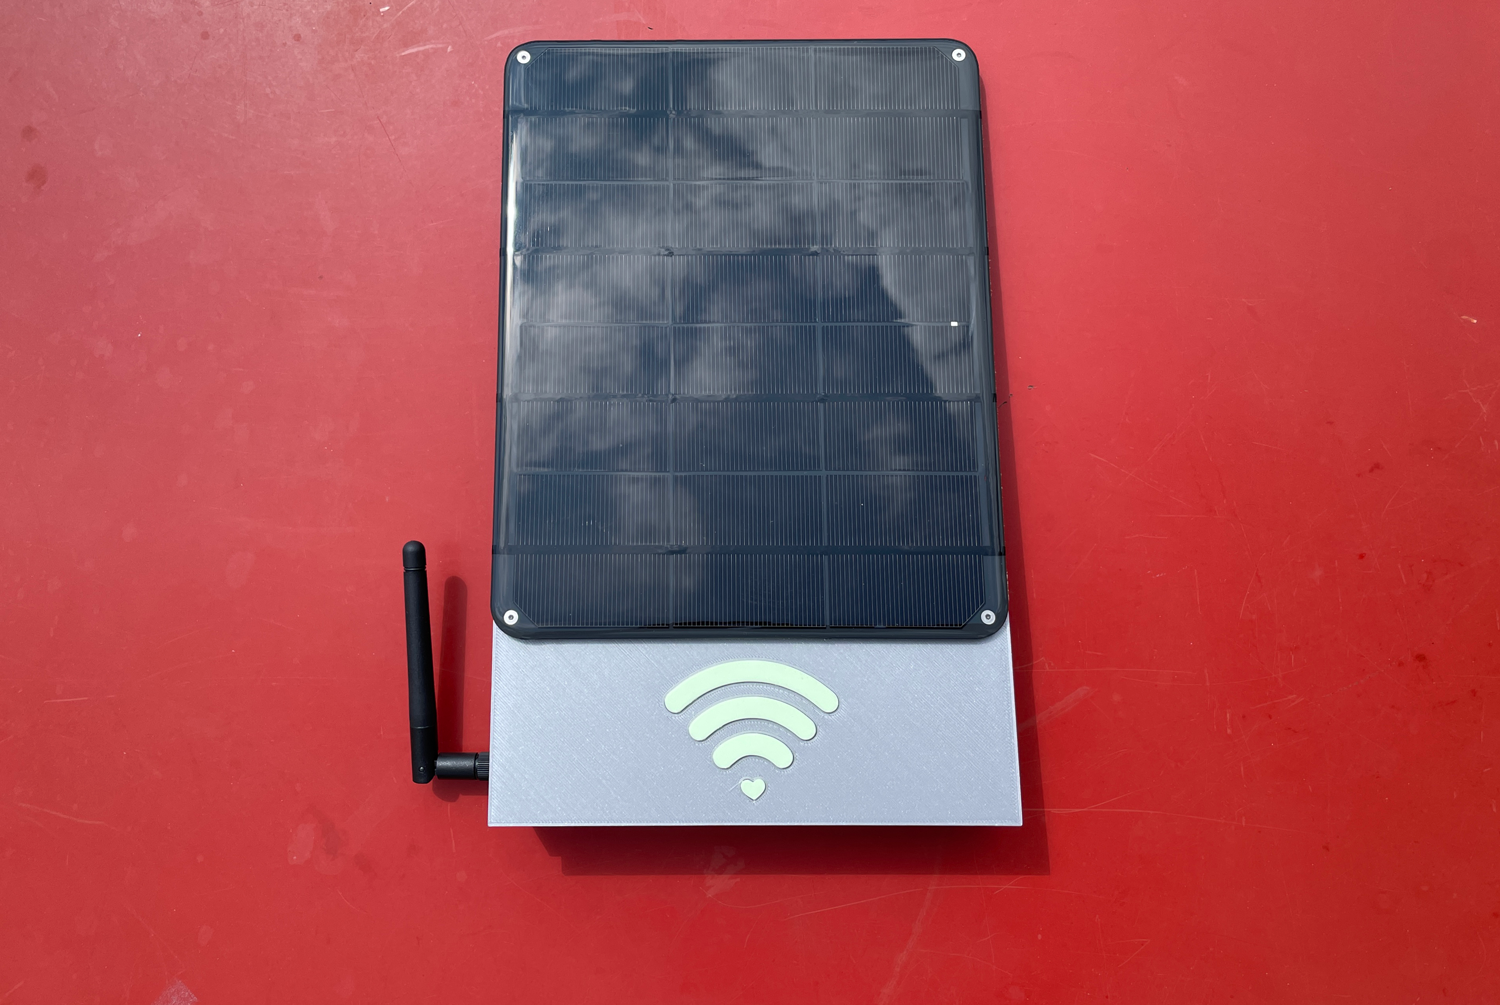
Here we look at how an ESP8266 microcontroller can be turned into a miniature web server / WIFI hotspot. This webserver opens a wifi network to which any device – computer or mobile can connect. When you connect to the network, a popup window will appear on your device showing you a web page stored on the SD card of the rogue router.
Preparation
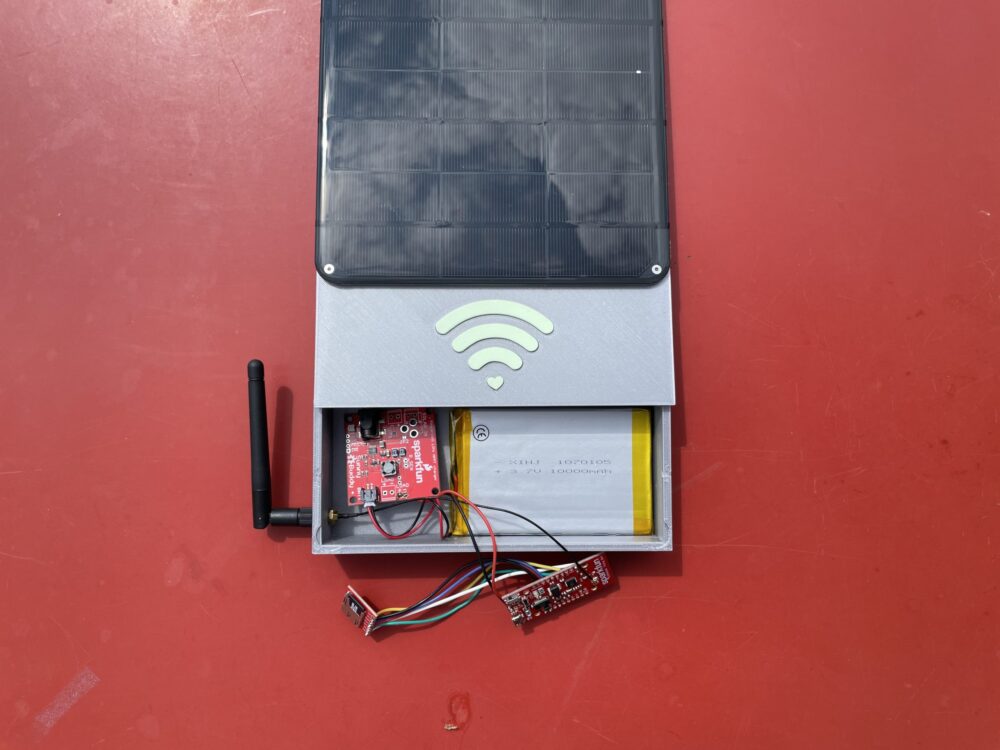
Bill of Material
- ESP8266 Sparkfun Thing Dev
- WIFI Antenna
- Solar Panel
- LiPo Battery
- LiPo Solar Charging Board (Sunny Bunny)
- MicroSD Card Reader
- MicroSD Card
- A bit of wire and solder
File Download: Code and 3D Print Files
https://github.com/MediaDock/ESP8266_RogueRouter
Hardware
Why the ESP8266 microcontroller?
The ESP8266 can open a WiFi network like most ESP chips and allows wireless data transfer. Which is essential in this case of a rogue router.
Software
Install the Arduino IDE
Download the Arduino IDE and install it according to your operating system:
If you need a guide for installing the Arduino IDE, you can find it here:
Installing the ESP8266 in the Boardsmanager of the Arduino-IDE
Before we can use the Arduino IDE with the ESP8266, we need to install another board manager. We need to take the following two steps: installing the new board manager and installing the ESP board itself.
1. install ESP8266 in the boards manager
ESP8266 has a board manager that can be installed with the various other ESP boards and work many other products with the same chip. It can be installed as follows:
-
- Open the Arduino IDE
- Click on the menu
- Mac: ‚Arduino‘ and then on ‚Preferences
- Windows: ‚File‘ and then on ‚Preferences‘.
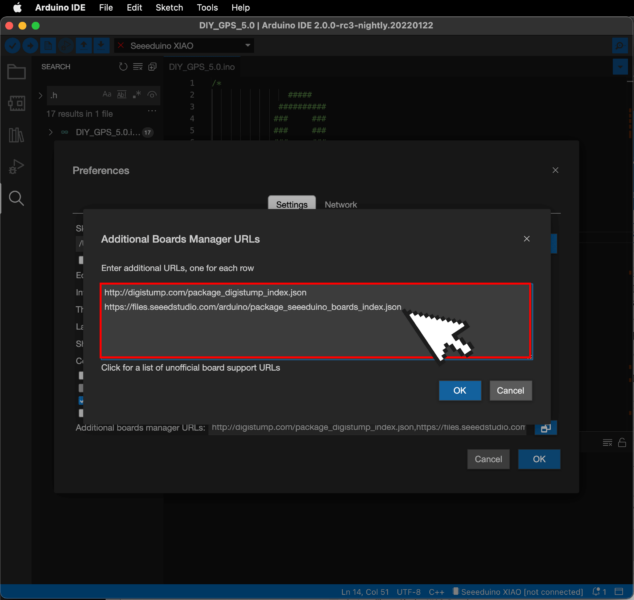
- The ‚Preferences‘ window will open.
- Locate the ‚Additional Boards Manager URLs‘ text box at the bottom of the preferences window.
Open this field by clicking on the icon on the right:
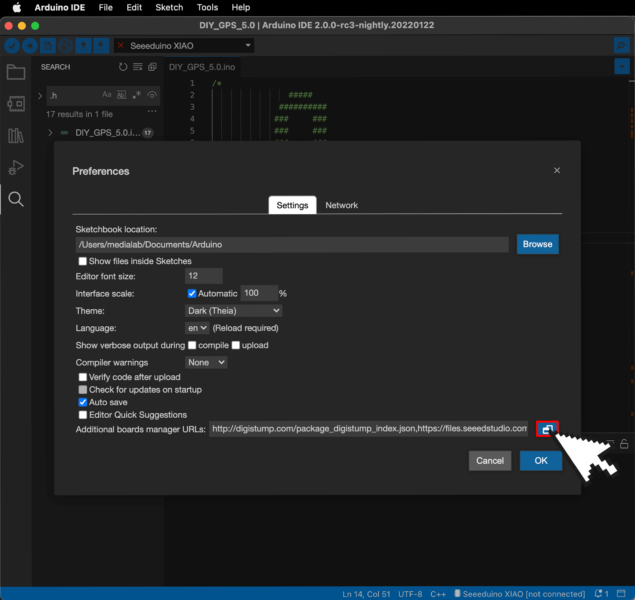 Copy the following URLs and add them to the list:
http://arduino.esp8266.com/stable/package_esp8266com_index.json
2. install the ESP8266 board
Now that the new boards manager has been installed in your Arduino IDE, you can perform the final step – installing the ESP board itself.
To open the board manager, go to ‚Tools‘ in the top menu and select ‚Boards Manager‘ or click on the boards manager icon on the left side of the window in the new Arduino IDE. After that you can search and install the ESP8266 via ‚Filter your search‘.
Attention use ESP8266 core 2.7.4. !!!
This project only worked with version 2.7.4. of the ESP8266 core! Make sure that you install the correct version of the Arduino IDE.
Build
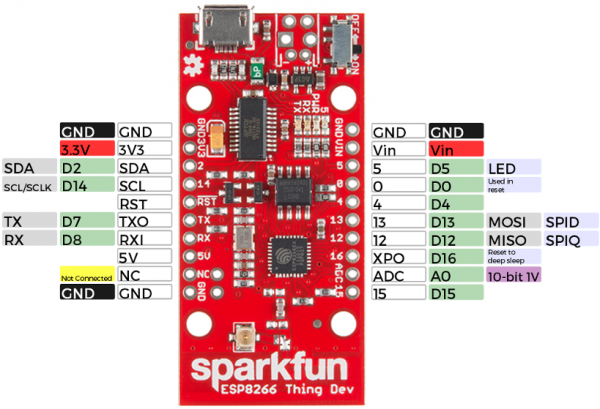
Pin Layout ESP 8266 Thing Dev
 Fritzing
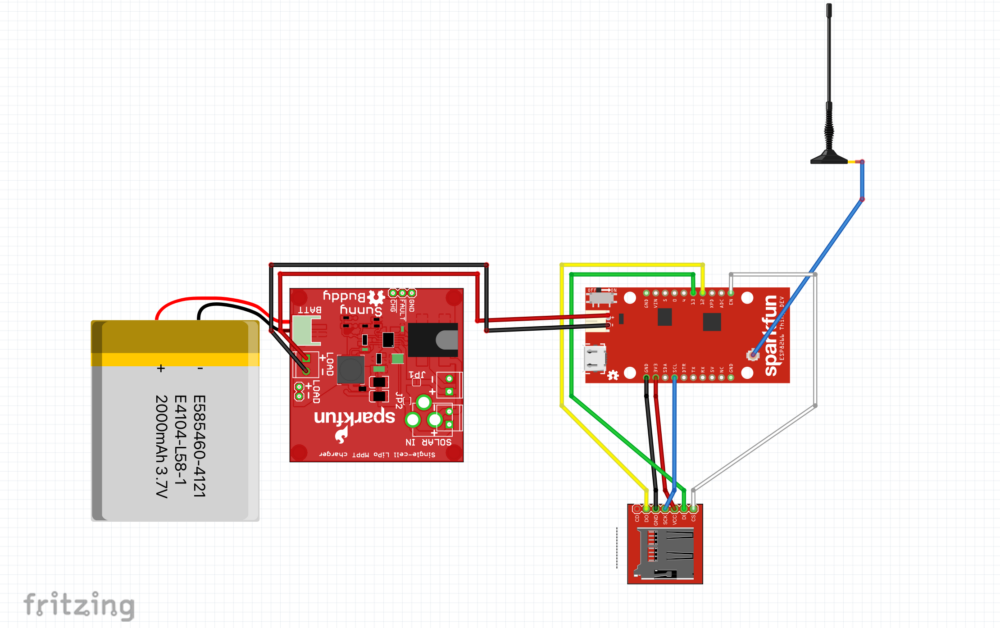
SD Module
ESP8266 —> SD Module
- GND —> GND
- 3V3 —> VCC
- 15 —> CS
- SCL —> SCK
- 12 —> D0
- 13 —> DI
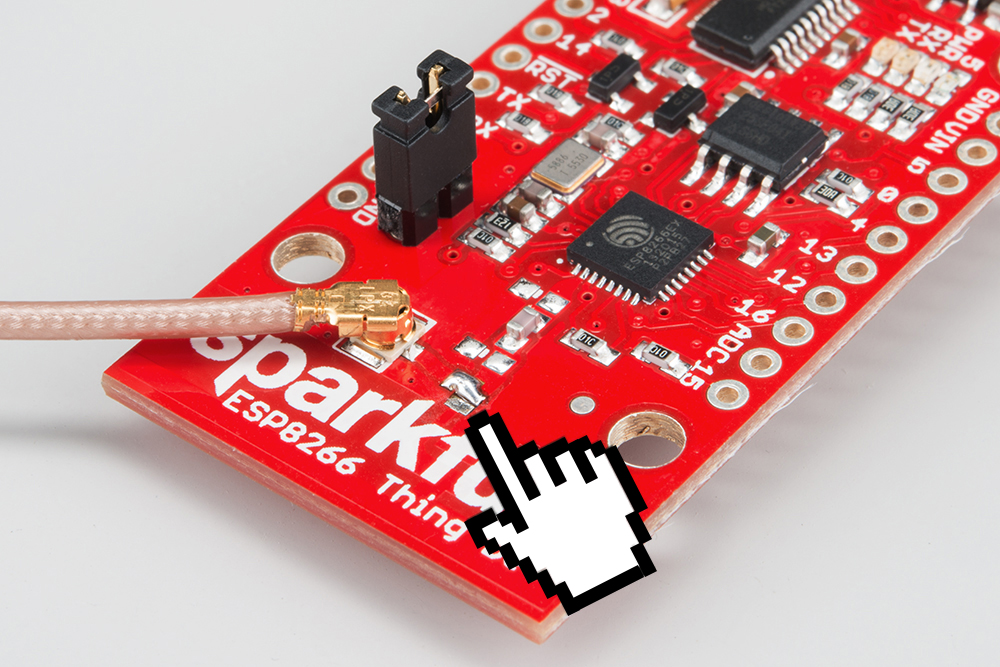
Selecting the Antenna
The Thing Dev Board’s default WiFi antenna is a PCB trace antenna based on this TI app note. It’s cost-effective and actually works really well!
If you need to connect a more sensitive antenna, or need to route outside an enclosure, a U.FL connector is also available on the board, but isn’t connected by default to the ESP8266’s antenna pin. To connect this antenna to the chip, you’ll need to swap the jumper by removing the solder blob and pushing it over to the other side.
Code Upload
Everything assembled? Then connect your ESP via USB with your computer, open the RogueRouter_ESP8266_MIN.ino
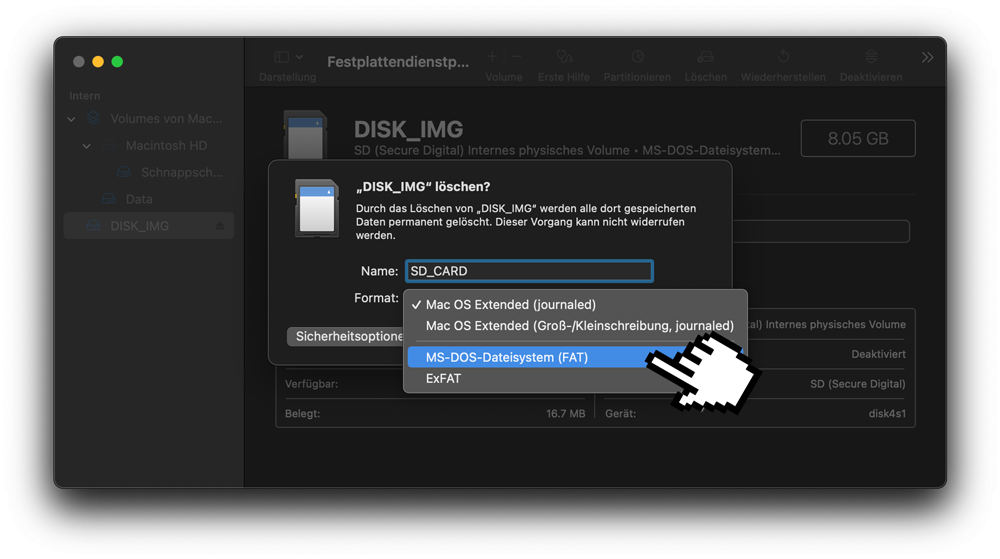
 Formatting the SD Card
This process describes how you can reformat an SD card. ATTENTION: All data on the card will be deleted! Be 100% sure that you have selected the correct card.
- Connect your SD card to your computer.
- Open the disk utility program.
- Select your SD card. ATTENTION: Make sure you have selected the correct drive.
- Click on Delete.
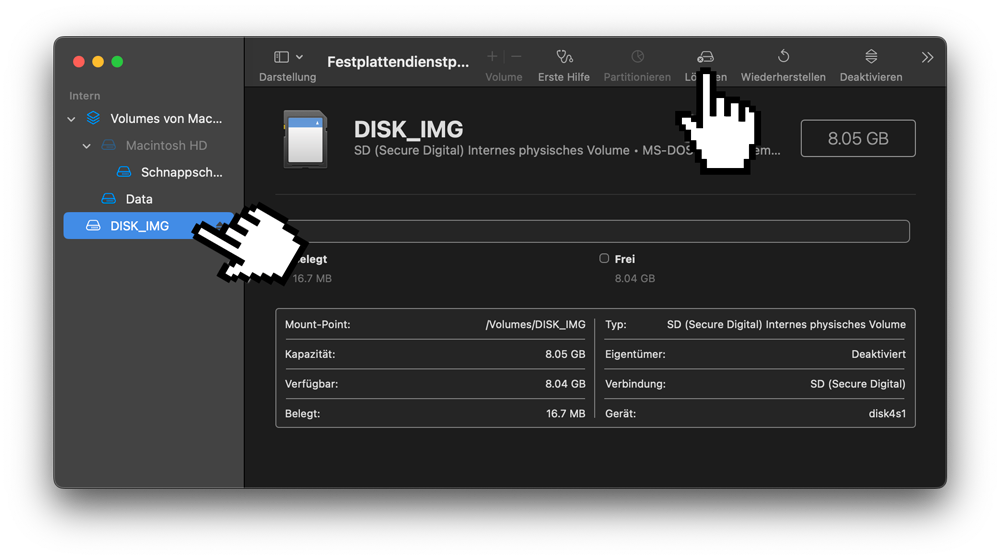
- In the popup window select a new name for your SD card.
- Under Format select FAT and delete / format the card.